Paper Plane Launcher
Description:
The Paper Plane Launcher is a fully automated self operated device that runs on the Raspberry Pi powered by a 6V battery. It demonstrates the laws of projectile motion including velocity, distance, time, and trajectory. It is designed and constructed based on the engineering design process that is followed in the Coder-Maker program.
Learning Objectives:
- The paper plane launcher is an integrated system that helps students learn and apply the following:
Coding, electronics, robotics science, and physical science through a hands-on application that can be directly related to real life situations.
Motion concepts of the science of motion, mainly projectile motion:
- Vertical and horizontal distance
- Vertical, horizontal, initial, and final velocity
- Time of flight
- Maximum height reached
- Acceleration and gravity
- Angular and horizontal momentum
The implementation of the engineering design process
Application of theoretical concepts to real life situations
Use vectors
Materials Needed:
- Raspberry Pi with micro SD card and Raspbian
- One ultrasonic sensor
- Two 6V simple DC motors
- One 6V gear motor 10 rpm
- 4*1.5V batteries
- 2 CD’s
- 2 rubber wheels
- IC 293D
- Jumper wires
- Resistors 300Ω or similar
- Breadboard
- Glue gun and glue sticks
- Cutter blades or scissors
- Thin sturdy cardboard (poster or portfolio cardboard)
Setup and Functionality:
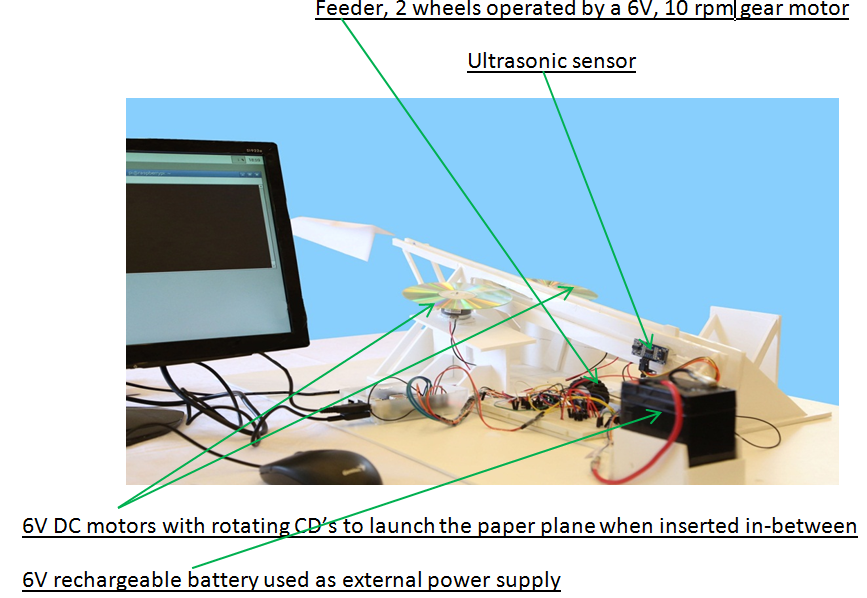
The paper plane launcher is a project that runs on Raspberry Pi and uses rotating launcher motors, an ultrasonic sensor, and a paper plane feeder to launch paper planes. It consists of two motors with circular compact discs that are installed on the motors axes. The motors rotate in opposite directions in order to ensure launching in a forward direction. The motors are placed on two sides of an inclined double-sided slide with a clearance of two centimeters in-between. The paper plane is set at the beginning of the slide and is pushed towards the rotating CD’s with the action of the feeder, which is a tiny vehicle with a slow moving gear motor that is activated by the action of an ultrasonic sensor which is installed on the side where the paper plane is positioned in preparation for launching. When a paper plane is placed on the launching position, the sensor is triggered and the launcher motors will be started. The feeder will start to push the paper plane after the launcher motors gain full speed. The angle of inclination of the slide with the horizontal surface can be altered to experiment and calculate the effect of this angle on the projectile motion.
Circuitry and Electronics:
The digrams below show all the wiring and connections of all the componenets used in the paper plane launcher:
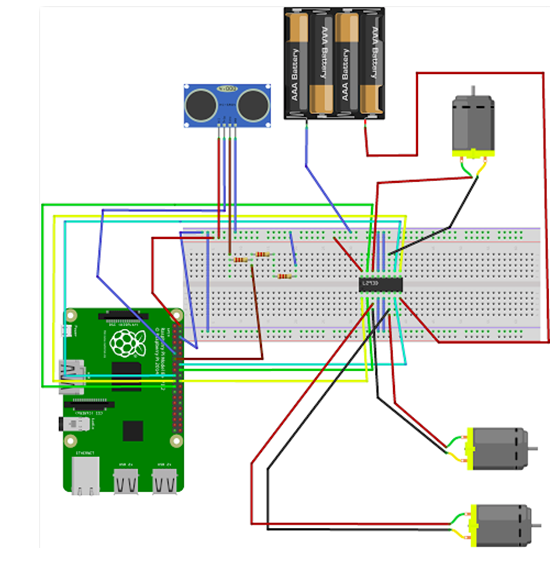
Figure 1: shows the wiring and connections of all the components to the Raspberry Pi
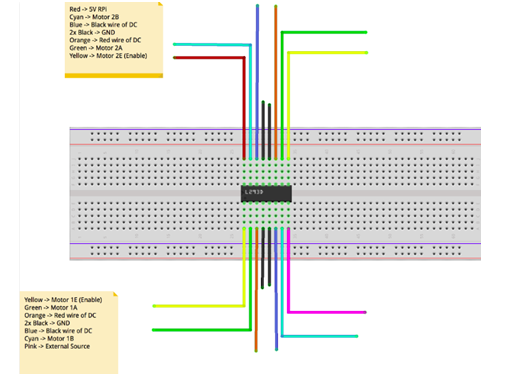
Figure 2: shows the connections of the external power, the Raspberry Pi, and the components to the IC 293D
The function of the IC 293D is to allow the installation of an external power supply and to allow forward and backward movement of the motors.
Warning
Proper attention should be given to the wiring of the IC293D. Make sure to follow the diagram above. In addition, changing the polarity of the battery will cause the current to reverse. This will lead to the overheating and damage of the IC. If this happens, the battery needs to be disconnected. Avoid touching the IC as it might cause skin burn.
Programming:
The paper plane launcher has been programmed using Python language. Below are two different scripts that lead to the same result. One uses functions and one uses simple python language that does not include functions.
Script 1: Using Python functions:
import RPi.GPIO as GPIO
import time

GPIO.setmode(GPIO.BOARD)

# feeder
Motor1A = 23
Motor1B = 19
Motor1E = 21

# paper launcher
Motor2A = 18
Motor2B = 16
Motor2E = 22

Trig = 11
Echo = 13

GPIO.setup(Trig, GPIO.OUT)
GPIO.setup(Echo, GPIO.IN)
GPIO.setup(Trig, GPIO.LOW)
GPIO.setup(Motor1A, GPIO.OUT)
GPIO.setup(Motor1B, GPIO.OUT)
GPIO.setup(Motor1E, GPIO.OUT)
GPIO.setup(Motor2A, GPIO.OUT)
GPIO.setup(Motor2B, GPIO.OUT)
GPIO.setup(Motor2E, GPIO.OUT)


def Reading(trigger, echo):
    GPIO.output(trigger, False)
    time.sleep(0.3)
    GPIO.output(trigger, True)
    time.sleep(0.00001)
    GPIO.output(trigger, False)
    while GPIO.input(echo) == 0:
        signaloff = time.time()
    while GPIO.input(echo) == 1:
        signalon = time.time()
    timepass = signalon - signaloff
    distance = timepass * 17000
    return distance


def MoveForward():
    GPIO.output(Motor1A, GPIO.HIGH)
    GPIO.output(Motor1B, GPIO.LOW)
    GPIO.output(Motor1E, GPIO.HIGH)


def TurnLauncherOn():
    GPIO.output(Motor2A, GPIO.HIGH)
    GPIO.output(Motor2B, GPIO.LOW)
    GPIO.output(Motor2E, GPIO.HIGH)


def MoveBackward():
    GPIO.output(Motor1A, GPIO.LOW)
    GPIO.output(Motor1B, GPIO.HIGH)
    GPIO.output(Motor1E, GPIO.HIGH)


def TurnOff():
    GPIO.output(Motor1E, GPIO.LOW)
    GPIO.output(Motor2E, GPIO.LOW)

while True:
    distance = Reading(Trig, Echo)
    print (distance)
    time.sleep(1)
    if(distance < 7):
        TurnLauncherOn()
        time.sleep(5)
        MoveForward()
        time.sleep(2)
        MoveBackward()
        time.sleep(2)
        TurnOff()
    GPIO.cleanup()
Script 2: Python language with no functions:
import RPi.GPIO as GPIO
import time
GPIO.setmode(GPIO.BOARD)

# feeder
Motor1A = 23
Motor1B = 19
Motor1E = 21

# paper launcher
Motor2A = 18
Motor2B = 16
Motor2E = 22

Trig = 11
Echo = 13
GPIO.setup(Motor1A, GPIO.OUT)
GPIO.setup(Motor1B, GPIO.OUT)
GPIO.setup(Motor1E, GPIO.OUT)
GPIO.setup(Motor2A, GPIO.OUT)
GPIO.setup(Motor2B, GPIO.OUT)
GPIO.setup(Motor2E, GPIO.OUT)
GPIO.setup(Trig, GPIO.OUT)
GPIO.setup(Echo, GPIO.IN)

while True:
    GPIO.output(Trig, False)
    time.sleep(0.3)
    GPIO.output(Trig, True)
    time.sleep(0.00001)
    GPIO.output(Trig, False)
    while GPIO.input(Echo) == 0:
        signaloff = time.time()
    while GPIO.input(Echo) == 1:
        signalon = time.time()
    timepass = signalon - signaloff
    distance = timepass * 17000
    print(distance)
    time.sleep(1)
    if distance < 7:
        GPIO.output(Motor2A, GPIO.HIGH)
        GPIO.output(Motor2B, GPIO.LOW)
        GPIO.output(Motor2E, GPIO.HIGH)
        time.sleep(5)
        GPIO.output(Motor1A, GPIO.HIGH)
        GPIO.output(Motor1B, GPIO.LOW)
        GPIO.output(Motor1E, GPIO.HIGH)
        time.sleep(2)
        GPIO.output(Motor1A, GPIO.LOW)
        GPIO.output(Motor1B, GPIO.HIGH)
        GPIO.output(Motor1E, GPIO.HIGH)
        time.sleep(2)
        GPIO.output(Motor1E, GPIO.LOW)
        GPIO.output(Motor2E, GPIO.LOW)
        GPIO.cleanup()
Science Concepts and Skills:
The paper plane launcher helps students learn and apply the Engineering Design Process, learn how to connect electric and electronic circuits, work in teams, solve problems, and relate their learned concepts to real life situations.
Through the paper launcher project students will learn to choose and use physics formulas in proper context and relate their findings and solutions to daily life where they start to make sense and do not remain abstract theories.
The motion learner objectives stated above can be attained through the following applications that are based on the diagram:
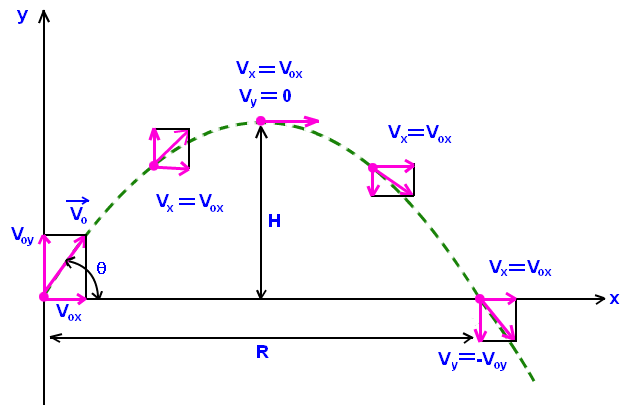
Calculating Velocity and Distance:
- Horizontal distance, x=V_x t
- Horizontal Velocity, V_x=V_{0x}
- Vertical distance, y=V_{0y} t–\frac{1}{2}g t^2
- Vertical Velocity, V_y=V_{0y} – g t
Where
V_x is the velocity along x-axis,
V_{0x} is the initial velocity along x-axis,
V_y is the velocity along y-axis,
V_{0y} is the initial velocity along y-axis.
g is the acceleration due to gravity and
t is the time taken.
Calculating Time and Height:
- Time of flight, t=2V_0\frac{\sin \theta}{g}
- Maximum height reached H=V_02 \frac{\sin 2\theta}{2g}
Where
V_0 is the initial Velocity,
\sin \theta is the component along the y-axis, \sin \theta=\frac{V_{0y}}{V_0} which can also be written as V_{0y}=V_0 \sin \theta and
\cos \theta is the component along the x-axis, \cos \theta=\frac{V_{0x}}{V_0} which can also be written as V_{0x}= V_0 \cos \theta.
Calculating acceleration:
Acceleration can be calculated using the formula that applies out of the ones below:
d = v_0t + 0.5at^2 v_1 = v_0 + at v_{12} = v_{02} + 2ad
where
d=\text{displacement}
a=\text{acceleration}
t=\text{time}
V_1=\text{final velocity of the paper plane}
V_0=\text{initial velocity}
For horizontal components of the projectile, the following formulas can be used:
x = v_{0x}t + 0.5a_xt^2 v_{1x} = v_{0x} + a_xt v_{1x}^2 = v_{0x}^2 + 2a_xx
where
x=\text{horizontal displacement}
a_x=\text{horizontal acceleration}
t=\text{time}
V_{1x}=\text{final horizontal velocity}
V_{0x}=\text{initial horizontal velocity}
The same formulas can be applied to find the vertical components; however, x has to be replaced by y:
y = v_{0y}t + 0.5a_yt^2 v_{1y} = v_{0y} + a_yt v_{1y}^2 = v_{0y}^2 + 2_{ay}y
Calculating the final velocity V_1: The final velocity can be derived based on V_x and V_y. \cos \theta=\frac{V_x}{V_1} which can be written as V_1=\frac{V_x}{\sin \theta} or \sin \theta=\frac{V_y}{V_1} which can be written as V_1= \frac{V_y}{\sin \theta}.
Converting angular velocity to linear velocity:
Angular and linear velocity can be converted from rotations per minute (rpm) to meters per second (m/s). This will help determine the initial velocity of the paper plane.
v = r × v_a × 0.10472
Where
v is the linear velocity in m/s
r is the radius of the launcher CD’s in meter
v_a is the angular velocity, in rpm (rotations per minute)