The Remote Controlled & Automated Garage (Student Version)
Description
The Garage is a project that runs on Raspberry Pi. It has a gate that opens and closes to allow entry and exit of cars. The entry gate is controlled remotely by the user’s mobile device and the exit gate opens automatically when sensing a car. The Garage is designed and constructed based on the engineering design process that is followed in the Coder-Maker program.
Materials Needed:
- Raspberry Pi with micro SD card and Raspbian
- Two ultrasonic sensors
- Micro servo motor
- Jumper wires
- Resistors 300Ω or similar
- Breadboard
- Glue gun and glue sticks
- Cutter blades or scissors
- Thin sturdy cardboard (poster or portfolio cardboard)
Setup and Functionality:
The Garage is a system that is controlled by two ultrasonic sensors that are connected to a micro servo motor. The gate consists of a bar that rises up to an angle of 45° from horizontal position when it is open and goes back to its original position when closed. The opening and closure of the bar is operated by the micro servo motor. The gate movement is fully automated. It opens by sending a command to the Raspberry Pi from the mobile device of the user through the WIFI by using a simple phone app. The bar closes automatically after 5 seconds, unless there is a car blocking the entrance. Two ultrasonic sensors are installed, one al the entrance at the level of the bar and one on the exit wall of the Garage. The function of the one facing the bar is to prevent it from closing if a car is exiting or entering the Garage and is still stopping under the bar in order to prevent damage. The function of the one on the exit wall is to give an order to the micro servo motor to open the bar automatically allowing the car to exit.
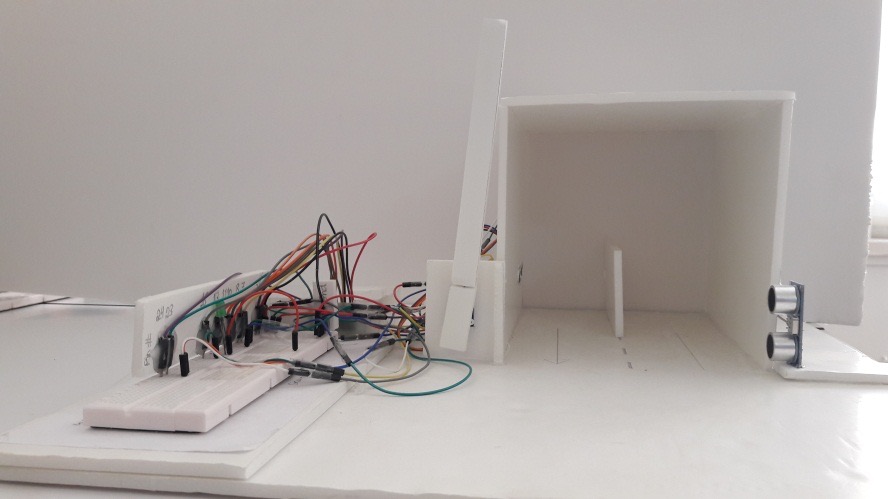
Figure 1: Shows a picture of a constructed garage
Circuitry and Electronics:
The diagrams below show all the wiring and connections of all the components used in the Garage:
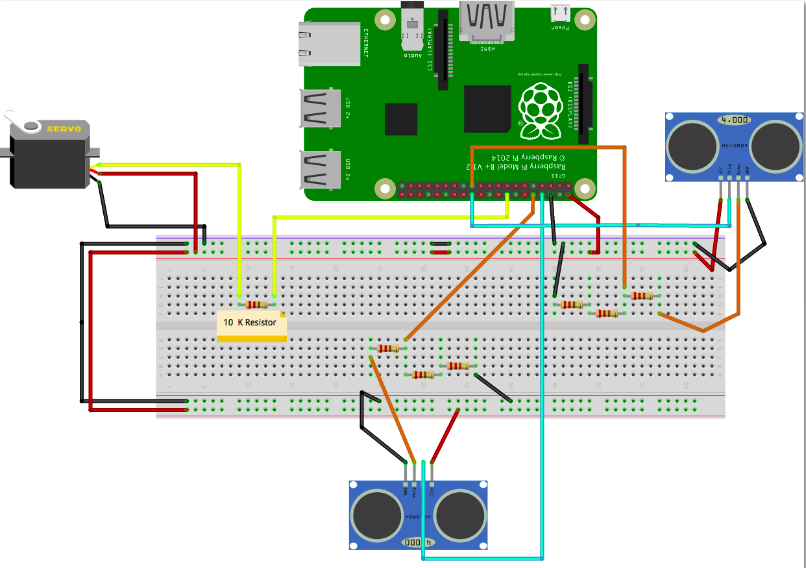
Warning
The micro servo motor does not consume much current and can be operated directly on the Raspberry Pi 6V power output. Make sure to use the same type of motor as other types might require a current that the Raspberry Pi cannot handle unless a transistor is added to the circuitry or an external power supply.
Programming
The Garage is programmed using Python language:
Using Python functions:
import RPi.GPIO as GPIO
import time
import Tkinter
from threading import Thread

TrigOpen = 24
EchoOpen = 23
TrigClose = 8
EchoClose = 10
ServoM = 16
GPIO.setwarnings(False)
GPIO.setmode(GPIO.BOARD)
GPIO.setup(TrigOpen, GPIO.OUT)
GPIO.setup(EchoOpen, GPIO.IN)
GPIO.setup(TrigClose, GPIO.OUT)
GPIO.setup(EchoClose, GPIO.IN)
GPIO.setup(ServoM, GPIO.OUT)
Servo = GPIO.PWM(ServoM, 50)
distance = 7


def reading(trig, ech):
    GPIO.output(trig, False)
    time.sleep(0.3)
    GPIO.output(trig, True)
    time.sleep(0.001)
    GPIO.output(trig, False)
    signalOff = time.time()
    while GPIO.input(ech) == 0:
        signalOff = time.time()
    while GPIO.input(ech) == 1:
        signalOn = time.time()
    timePassed = signalOn - signalOff
    distance = timePassed * 17150
    distance = round(distance, 2)
    return distance


def SensorReading():
    while True:
        time.sleep(0.5)
        distance = reading(TrigOpen, EchoOpen)
        if(distance < 5):
            isOpen = 1
            while(isOpen == 1):
                print("should open")
                Servo = GPIO.PWM(ServoM, 50)
                Servo.start(50)
                Servo.ChangeDutyCycle(12.5)
                time.sleep(5)
                distanceClose = reading(TrigClose, EchoClose)
                if distanceClose < 10:
                    print("can not close the gate")
                else:
                    Servo.ChangeDutyCycle(7.2)
                    isOpen = 0
                time.sleep(1)
                Servo.stop()


def Open():
    Servo = GPIO.PWM(ServoM, 50)
    Servo.start(50)
    Servo.ChangeDutyCycle(12.5)
    time.sleep(5)
    isOpen = 1
    while(isOpen == 1):
        distanceClose = reading(TrigClose, EchoClose)
        if(distanceClose < 10):
            print("can not close the gate")
        else:
            Servo.ChangeDutyCycle(7.2)
            isOpen = 0
        time.sleep(1)


# In the next instruction we creat a Thread called 'thread2' and
# assign the thread to work on the function called 'SensorReading'
thread = Thread(target=SensorReading)

# In the next instruction we instruct the Pi to activate the thread.
thread.start()

top = Tkinter.Tk()
# Our main thread continues and creates a user interface using Tkinter.
open = Tkinter.Button(top, text="Open", command=Open)
# Creating A button, when pressed the function Open will be performed.
open.pack()
top.mainloop()
# This Instruction assures that our main thread will be occupied all the time
# by the Graphical Interface and waiting for someone to press the button.
Graphical Interface in Python
Usually in our tutorials we never used a graphical interface. In this tutorial and in order to control the garage with our phones in the simplest way possible (Using VNC*) we have to create a graphical interface in which the user can press a button that will automatically open/close the gate. An example to create a user interface is by using the TKinter Class.
What is A Graphical Interface also known as GUI(Graphical User Interface):
Every App that you usually use -Microsoft Word, Whatsapp, Itunes, Windows Media Player,… - has a graphical interface in which there are buttons you can press on to control the app, a TextEdit Box in which you can write a text etc…
Multithreading:
In order to make an application that keeps calculating the distance at all time and use a graphical interface to open the gate by clicking on a button we need to apply a concept called multi Threading. In fact, in order to explain what is multiThreading, we will begin to explain what is an instruction. An instruction is a segment of code that contains steps that need to be executed by the computer processor. for example assigning a value to a variable, incrementing the variable.
What is a thread?
A normal, simple script is being run one thread, which means that at a certain time t, the processor is only working on one instruction of our script. In fact when you run a code the processor is analyzing and working on one instruction after the other. When we talk about multithreading we think about a set of instructions being worked on in parallel. In our example Reading data from the sensor and Waiting for someone to press a button. Refer to the code explanations in red in order to learn how to work on multithreading.
VNC (Virtual Network Computing):
The Simplest way to control your raspberry pi with your phone is by connecting the raspberry pi to the internet using a wifi dongle and connecting the phone to the SAME network and use a VNC software - RealVNC //being free and easy to use -. A VNC will open the Raspberry pi on your phone, instead of using a keyboard,mouse and a monitor you can use your phone to operate the raspberry pi. VNC are not only for raspberry pi in fact you can control your own PC by your phone using a VNC In order to install VNC.**
Do not run your project using your monitor screen, in fact when the raspbian Desktop screen appears on your phone, click on terminal and run your code. (sudo python -nameOfProject-.py)
| On your phone | On your Raspberry Pi |
|
|