6. Sensors
6.1. Ultrasonic Sensors
The ultrasonic sensor is used to measure distances by using sound waves. The distance is measured based on the time it takes the pulse to reach the object and come back. Since the sensor uses sound waves, then the distance is equal to the speed of the sound waves multiplied by the time needed for the pulse to reach the object and come back divided by two:
Distance = SpeedOfSound * Time/2
SpeedOfSound is 34300 cm/s; and time in seconds
So Distance(cm) = 17150 * Time(s)
6.1.1. How to Connect the Sensor?
The ultrasonic sensor has 4 pins:
GNDconnected to the ground (Gnd) pin of the RVccconnected to the 5V pin of the RPi;ECHO(pulse output) connected to a RPi GPIO pin;TRIG(or trigger: pulse input) connected to an RPi GPIO pin.
In this example:
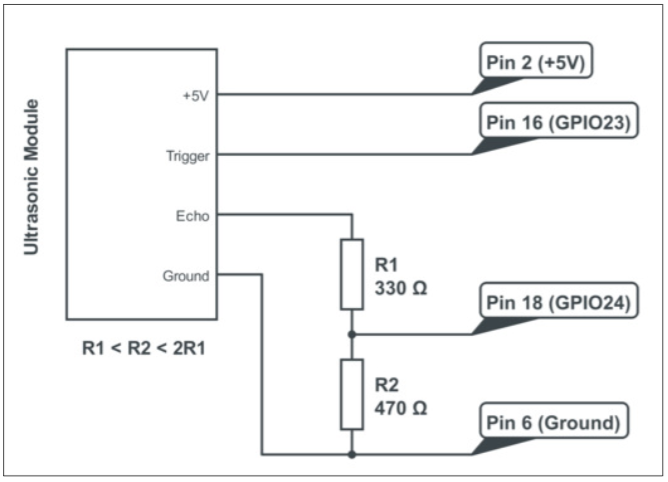
- Vcc pin is connected to the pin# 2 (5V);
- Trig to pin# 16 (GPIO23)
- Echo to pin# 18 (GPIO24)
- Gnd to pin# 6
- Two resistors are needed on the circuit.
- R1=330Ω and R2=470Ω (as shown below).
Schematic:
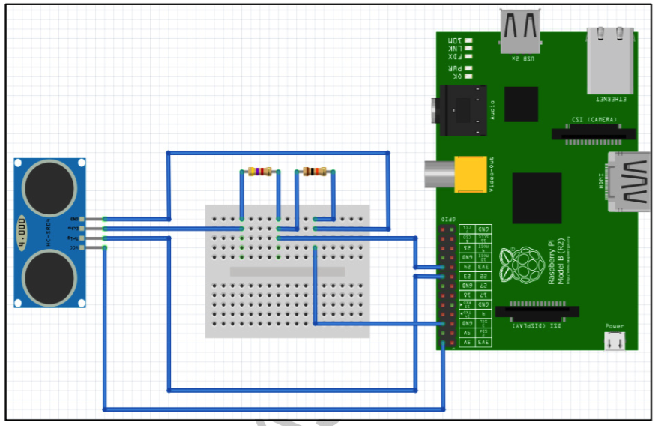
The wiring of the Raspberry Pi to the breadboard, resistors, and the sensor is shown the figure below:
6.1.2. Python program to measure distance
6.2. Weather Sensors
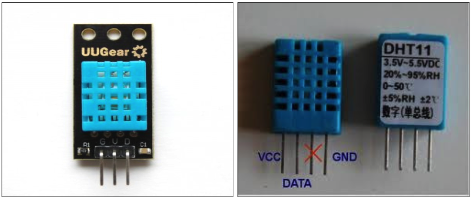
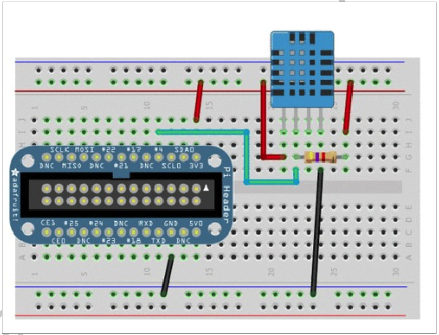
DHT11 or DHT22 temperature and humidity sensor are two RPi compatible sensors. For RPi, 3 pins on the sensor are used even if there are four sensors in some models. Holding the sensor with front side facing, the left pin needs to be connected to the RPi 3.3V pin, the right pin to the RPi Gnd pin, and the middle one (or the one next to the Vcc one in case of 4 pins) to the RPi GPIO 4 (pin#7 on RPi board). Make sure you connect the data pin to a 10kΩ resistor between the Vcc and the data wires.
The Temp and Humidity sensor requires its own library in order to work on RPi. It can be downloaded and installed using the following steps.
The following has to be done on the terminal window of the RPi.
sudo apt-get update
sudo apt-get install build-essential python-dev python-openssl
git clone https://github.com/adafruit/Adafruit_Python_DHT.git
cd Adafruit_Python_DHT
sudo python setup.py install
To try the sensor, type the following in the terminal window:
cd examples
sudo ./AdafruitDHT.py 11 4
Where 11 is the DHT sensor type DHT11 and 4 is the GPIO number (pin#7)
This should show two readings on the screen, one for temperature and another for humidity.
6.2.1. Python program to read Temperature and Humidity
6.2.2. Resource
DHT22 Raspberry Pi Humidity Temperature Sensor Tutorial:


